A Cost Center is a unit or part of your business (like a department, employee, branch, or project) where you want to track income and expenses.
If your business has different departments, branches, or projects, you need a smart way to track the expenses and incomes for each one separately. Cost Center helps you know which part of your business is making money and which part is spending more.
- Departments: Marketing, Sales, Administration.
- Projects: Construction Project A, Software Development Project B.
- Locations: Branch A, Branch B.
By assigning transactions to Cost Centers, you can monitor the financial performance of each unit independently.
Step 1. Enable Cost Centre Features by Pressing F11 Key
Enable Cost Centres = “YES”

Step 2. Create Cost Center as You Required
GOT → Create → Cost Centres
Step 3. Create Ledger as You Required
GOT → Create → Ledger
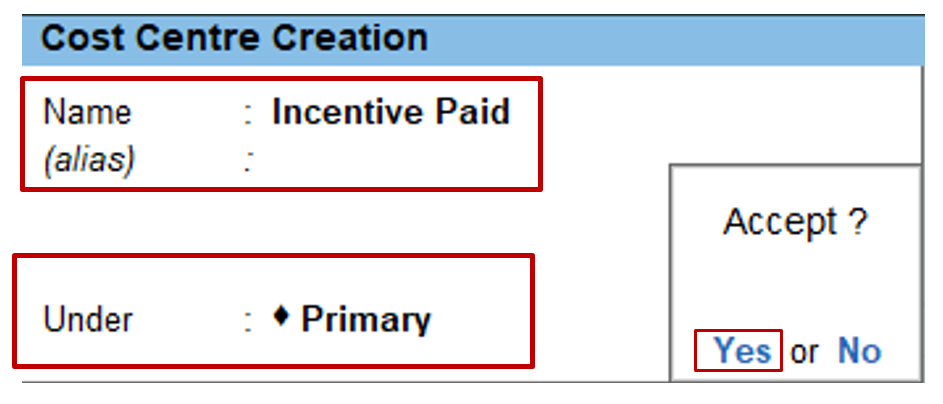
Suppose “Incentive Paid” to Our Employee which is Like this.

Step 4. Pass Payment Voucher With Cost Center
GOT → Vouchers → Payment
Select cost center here, if you are not able to see then press F12 key from keyboard.

display cost centres configuration

Now pass payment voucher

Assignment
Create following cost centres
GOT → Create → Cost Centres
- A. Salary Paid
- B. Electricity Charges
- C. Telephone Charges
- D. Commission Received
- E. Discount Received
Create following Ledger

Assignment Post the following transactions:
1. 01.04.2006 Salary Paid Rs. 200000:
- A. Purchases Department 30%;
- B. Sales Department 40%;
- C. Production Department 30%.
2. 01.05.2006 Electricity Charges Paid Rs. 30000:
- A. Purchases Department 25%;
- B. Sales Department 35%;
- C. Production Department 40%.
3. 01.07.2006 Telephone Charges Rs. 12000;
- A. Purchases Department 30%;
- B. Sales Department 35%;
- C. Production Department 35%.
4. 01.08.2006 Commission Received Rs.6000;
- A. Purchases Department 40%;
- B. Sales Department 40%;
- C. Production Department 20%.
5. 01.09.2006 Discount Received Rs. 4000;
- A. Purchases Department 40%;
- B. Sales Department 40%;
- C. Production Department 20%.
Example 1: Department-wise Expense Tracking (Office Setup)
A company is setting up a new office and wants to track how much money is spent by the Marketing and IT departments.
Create Cost Centres:
- Marketing Dept
- IT Dept
Transactions:
| Expense Description | Amount | Cost Centre | Voucher Type |
| Purchased Laptops | ₹80,000 | IT Dept | Purchase |
| Bought Posters & Flyers | ₹10,000 | Marketing Dept | Purchase |
| Internet Setup Charges | ₹5,000 | IT Dept | Journal |
| Social Media Ads | ₹15,000 | Marketing Dept | Payment |
Purpose:
Now, management can see how much each department spent and make budget decisions based on that.
Example 2: Branch-wise Profit Tracking (Retail Business)
A retail business has two branches—Delhi and Mumbai. The owner wants to see the profit made by each branch.
Create Cost Centres:
- Delhi Branch
- Mumbai Branch
Transactions:
| Description | Amount | Cost Centre | Voucher Type |
| Sales at Delhi | ₹1,20,000 | Delhi Branch | Sales |
| Purchase for Delhi | ₹80,000 | Delhi Branch | Purchase |
| Sales at Mumbai | ₹1,50,000 | Mumbai Branch | Sales |
| Purchase for Mumbai | ₹1,10,000 | Mumbai Branch | Purchase |
Profit Calculation:
| Branch | Income | Expense | Profit |
| Delhi Branch | ₹1,20,000 | ₹80,000 | ₹40,000 |
| Mumbai Branch | ₹1,50,000 | ₹1,10,000 | ₹40,000 |
Purpose:
Branch-wise tracking helps compare performance and plan future investments or expansions.
Cost Centers in TallyPrime are a powerful tool to track and analyze expenses and incomes for specific business units. Whether you’re managing departments, projects, or locations, Cost Centers help streamline financial reporting and improve decision-making.